Sunday, March 5, 2017

Hopefully Done With Play Sets for Awhile

I finally finished another farm play set.  I hope that it is all for awhile.  I do love making them, but after having made so many since the beginning of Dec., I am quite tired of knitting them.  I need to take a break from knitting for a time, at least.   I know it won't be long before I feel I need to make something more.

This is the new set. It is much like all the other farm sets except for the last one that had arches.  This is for a little girl so I made a girl doll to go with this set like the one I made in January for another little girl.

This shows the toys and cow pouch on top of the crib sized quilt that is going with this set.  This is the back of the quilt.  I showed the front in a previous blog. It has farm print material in the center.  I made it to go with the last girl farm set, but they did not want it since that little girl is already older.  This one is for a baby, so the quilt will go better with this set.
Nothing else going on for now.  I think I will be trying to learn a new craft for making this year's adult Christmas gifts.  I am going to try to learn how to wood burn and will be seeing if I get good enough at it to make presents.  Time will tell.  It is exciting to learn a new craft every once in awhile.

Monday, February 13, 2017

Seed Farmer play mat finished

I have finished with the seed farmer play mat set, except for the cow pouch.  I am partly done with it, but since I have shown pictures of what it looks like, I am not going to blog it with the set.  It will be finished to go with the set before I give it away.  The order request was for a farm set with arches.  My farm set usually does not have arches, but it is always easy enough to make it become one.  Most of the toys are machine sewn, so it was a little trickier to get the hooks on, but I think they look okay the way I did them.

This is the mat with all the toys hanging.  I actually made nine toys for this mat because they are small enough to have two hang from each side of the arches and one in the middle.  Usually, there are only five with one from each side of the arches.

This shows the mat without arches.  I designed this mat to
look like seed farmers like the couple that are having the
baby are. They grow organic seeds for market. I found
the perfect print material for the border.  It has rows and
rows of seed packets. Sunflowers is one of the types of
 seeds they grow, so the sunflowers were a nice touch.


This is the back of the mat.  It is simple and is made of a soft fleece.

The gender of the baby is unknown, so I just made the man
farmer doll. His hair is from fake fur. I made a small helmet
pattern with a gusset down the middle.  It was tricky to get the
shape I wanted to go around the ears and when I glued it on,
some of the glue showed.  I used hot glue at first, but it was
why the glue showed. Hot glue dries white and crusty. I had
to cut out the bad parts to get the glue out, cut some new
pieces to fill in the empty spots, and then I glued it on with
no sew glue which dries clear and does not glob up. The  other
problem I had with this doll is that after he was stuffed, I
realized his neck was too long. I had to tuck it down into
his body a little bit and sew it down so it was shorter.
Once I had the hat finished, it looked just fine. 

This little lamb always turns out just a little bit differently every
time I make it, but this one is adorable. The wooly looking
material I use is difficult to sew into such a small object.

I always do the duck for the farm mats, but this one is a little
different than my last two.  He is made of felt instead of
fleece and his beak and feet are made from some material
that I usually use for making diapers.
It is water absorbent material that is shiny and I like the
texture for these body parts.

I had so many problems getting the face of this kitty to look
right.  It is new to the set.  I added her as one of the extra four
I needed to complete this set.

This sweet little puppy is also one of the new ones. His ears
are always the part that looks strange when I first get it sewn.
They stick straight out like wings, so I had to tack them down
so he wouldn't fly away. He is also a little crooked, but he looks
good from this angle. His head is on a little sideways, but that
is okay. He just looks like he is looking to the side instead of
straight forward.

These are the four toys that I have made before and since they all look pretty much the same, I just took a picture of all of them together.  My last cow was reversed with the black and white areas.  Also, this one is made out of a soft fleece instead of the felt that I usually use for the cow.  Fleece is actually a little easier to use because it isn't as thick.  Felt is wonderful to use until you try to turn the tiny parts right side out through an extremely small opening.  Fleece turns a little easier, so when I found that I had some white and black fleece, I decided to use it instead of the felt.
I will get back to making the cow pouch so that I can be totally finished with this set.  The baby is due any day, so I am just getting it done in time for my son to give it to his friends when the baby comes.  However, I knew that if I didn't get it finished in time, it would still be okay.  It's not like the baby will be playing with the set for a few months. I think he just wanted to give them a gift when the baby arrived. Also, when I get going on a project, I like to finish it right away.  I started this set just last week, so I feel happy that I have been able to get it done so soon.  Designing the mat is always the hardest part.  It just takes so much time to figure out what will go on the mat, find the material necessary to meet the needs of the design, cut things out, heat bond them into place, and then applique' them all in place.  Choosing the materials and getting the toys cut out also takes up quite a bit of time.  It actually takes much less time to sew them than it does to get them cut out.

Saturday, February 4, 2017

Another Play Mat

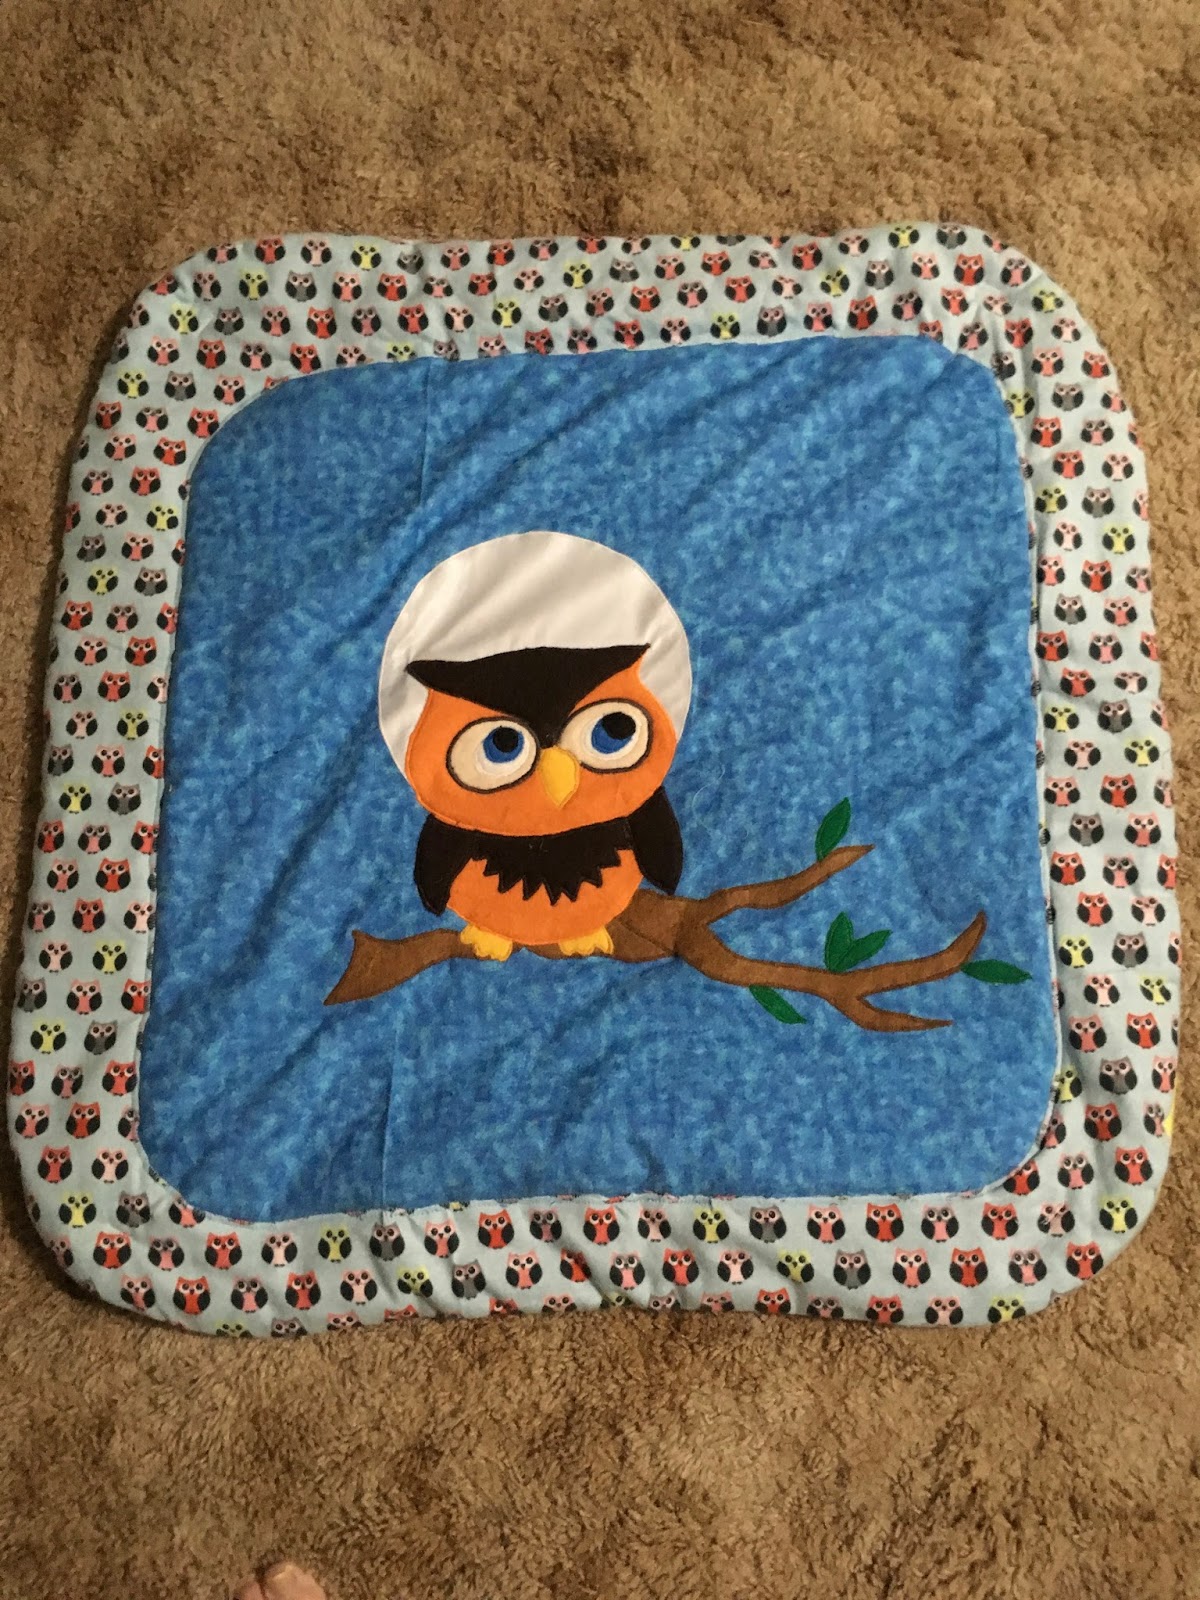
I have finished another play mat that my son ordered for his girl friend's sister who is having a baby girl.  They loved the last play set that I made with the fox theme, so they ordered one with a forest theme.  Two of the animals are the same as in the fox mat, but there are three new ones.  I had to go through the whole refiguration of the pattern to downsize the animals for the three new ones.  The other two were so easy because all of that was done before.  This mat is for a girl, but they didn't want any pink.  They figure she will get plenty of pink things and they wanted the animals to be in realistic colors.  One of the new animals is an owl.  I decided to make the background of the mat with an owl as the main theme.  The back is also with the same owl print that I used on the fox themed set. I had plenty of that fleece material left to make another mat. I downloaded a picture of an owl sitting on a branch of a tree that looked easy enough to applique' onto the mat.  I decided to sort of make it like a night owl, so I bought some material that sort of looks like sky.  I could have gotten a navy blue to make it darker, but I thought the lighter blue would look better for a baby.  They had so many shades of blue for this print, so I just chose the one that I thought looked better for a little girl and matched the owl print material that I found to use as the border.  Next, I had to find some material I liked for the arches.  I found lots of blue with white stars.  I wanted to use that as the arches, but there were also many shades of blue for that one.  It was a challenge to find the one that matched both the background color and the border color.  I was about to give up and go a different route from stars as the print when I located the perfect one.  With the material purchased, I went back to the owl.  I enlarged it with graphing again, 1/2" to 1".  To make it look more like a night owl, I put a large white moon behind the owl's head.  I think it is very cute and I am happy with the creation.

This shows the mat without the arches attached. I first tried just using fabric glue to attach the eyes because they have so many layers, but after getting everything else applique'd on, they didn't look right, so I also sewed them into place.  It was difficult to do.  It is hard to see in the picture, but the eyes have the white, a little bit of blue, and the small round black center.  I was afraid the needle might get jammed because of the amount of glue I had used to put them on, but it didn't and I really liked the way they looked once I did get them sewn around.  It made them stand out even more than before.

This is the mat with the arches and the animals attached.  The arches were an experience.  I wanted to make them a little taller than the ones I have made in the past, but I miscalculated how much taller they should be.  They are really tall, but I turned that mistake into what I like to refer as, "a happy accident."  By having taller arches, the mat can grow with the baby.  While the baby is still very young, she can lay on her back and reach up to the animals who are being hung with two or three rings instead of just one.  As she grows and can sit up, the extra rings can be removed so that the animals hang higher and she can still play with them, but more at her eye level.  Works for me.

This little hedgehog is one of the new characters to this set.  Kay, that is buying this set, chose this animal because she thinks it is so cute.  She really likes the way I made it, so I'm glad I did it, although it isn't really my favorite.  Kay loves the feet.

The little deer makes a cute animal for a forest themed play set.  It is rather sweet.

Here is the wise old owl.  It took a combination of two patterns to make this one.  I used the tail from another pattern, which you cannot see in the picture, because there wasn't one with this pattern.  I also added a belly to this one which was also not with the pattern.

These are the two like the ones from the other mat.

Sunday, January 22, 2017

Hats for the Missionaries

I often have the sister missionaries from my church over for dinner.  When I was making my things for the holiday festival and for Christmas presents, they seemed particularly interested in some hats I was making.  I decided that since I am almost finished with most of my projects that need to be done immediately that I would take the time to make some hats for these young ladies.  I have a pattern that has been most popular and of which I have sold at least three.  I decided to use this same pattern for both of them and just used a different colored yarn.  They can choose who gets which color.

The hats are made from left over yarn that I used to make sweaters out of.  It is 20% wool/80% acrylic.  They do look nice and will be plenty warm for them to wear while serving this winter in New England.  One of them is from Idaho and is used to the cold weather. The other one is from the warmer part of Brazil.  She was most excited about the hats I was making and was anxiously waiting to experience her first snow. I will give them the hats the next time they come to eat which is in a couple of weeks.  It hasn't been that cold to need them for now, anyway.
Now that I have finished the hats and the third play mat set, you would think I would have a break. Not so, I have at least one more play set to make and possible two more.  The next one is also going to be a forest set.  It is for my son's girlfriend's sister.  They saw the mat that I just made and fell in love with it.  They want one, but not with all the same animals.  That means that I will need to do more downsizing for possibly three more animals.  I will need to check their size first to be sure I do need to make them smaller.  I will be doing the raccoon and skunk again.  I think I may try doing the skunk its original size. I will also have to do a hedgehog, a deer, and an owl. I'm sure the deer will need to be made smaller, but the hedgehog and owl may not need downsizing.  The mat is for a girl, but they do not want any pink.  I am going to use the same owl fleece for the back of the mat as I used on my last one, but the front will be different.  Kay says her sister loves owls, so I am going to put a baby owl sitting on a branch of a tree on a light blue background material to look like a daytime sky.  I may add a sun for extra detail.  I will use the same material from the back for the edging unless I find something better in the store.  I know owls are quite popular right now, so it is a good chance that I will find some cute owl print material like I did for the fox mat.

Forest Play Mat Set

I have finished the forest play mat set.  It has been an interesting project.  I located a book of patterns for these adorable forest animals that had all but one of the requested animals for the set.  I was confident that I could turn the squirrel into a skunk, so I bought the book and was excited to start creating the animals.  The problem is, the patterns are for larger animals than will fit in a hanging play mat set.  I have halved patterns before, so I thought it would be no problem to do the same with these animals.  How do you half an odd number?  That was the problem, but because I wanted the animals to be smaller than larger, I always opted for the lesser number of rows, stitches, repetitions, etc.  Sometimes it works, but other times it gets off quite a bit.  All in all, they look okay.  I like the way these patterns give the animals more of a real animal look than do my other patterns for little animals.

This is the top of the mat.  The baby's room is being done in a fox theme with the colors of gray and navy blue.  I downloaded a picture of a fox and enlarged it by graphing 1/2" - 1".  It made it perfect for fitting on the mat.  I cut the fox out of orange fleece and white felt for the face and white fur for the chest and tail.  I used black felt for the feet, nose, and ears. I found this great fox print for the edging.

This is the bottom of the mat.  This fleece material with the adorable owls is perfect for a forest theme and a gray room.  I decided to stitch through all layers of the mat so that the fox outline would show up on the back of the mat as well as the front.  I usually just appliqué the top and then I have to tie the rest of the mat to keep it in place.  By doing it this way, the mat stays in place without tying it.   

This shows most of the animals as they are hanging.  I was unable to get a good angle to get all of them.  The bear is the most hidden of them all.  


This is the bear as will be seen by the baby as he lays on his back and looks up at the animals. This was the first animal I made and was surprised at how large he still turned out to be. I usually have my animals hang from their heads, but it was suggested by my sister-in-law that I should put the hanger on the back of the animal and have it face downward.  I hadn't thought of that, but that is what I did and it worked. The yarn I chose for this bear is really soft, but does not look as nice as I thought it would.  It was also very hard to work with.  One good thing is that it doesn't show mistakes. It was very difficult to get the straight needle through to sew the seams and to add the details like the eyes and toe nails.


A fox themed play set certainly needs a fox and this was the
reason I needed for buying the book of patterns. His nose is
a little shorter than it should be, but he sort of looks like a fox.

This shows the bottom of the fox and more of what the baby will see.


This is a squirrel/skunk.  I used the squirrel pattern and widened the tail and used fun fur to get the furry look. His front legs do not show up, but he does have them.  They just came out a little too short.  Another of my miscalculations.The problem I had with this skunk is that while most of the animals had patterns for 14"-15" animals, he was only about 9". I automatically started him with the half pattern like for the other animals. It wasn't until I had gotten the head done that I realized he was going to be much smaller than the others.  I thought I would need to do another one and just use this one for something else. When I got the tail on, he looked big enough and so he is it for the skunk that was requested.

Just wanted to show the stripe down his back.  I was able to use a pattern for another skunk pattern that I have to do the stripe.  I didn't just want to use that pattern for this skunk because the face is not done in the same manner as these animals. It is just a round head with the snout added.  This one has a more realistic looking face and fit this set of animals better.


This bunny was so hard to knit. I wanted to use this
super soft yarn, but it is not easy to sew together.
All his parts are sewn on so crooked, but it is almost
impossible to take out, so one arm is higher than
the other and one ear is lower. You can say he
has character.


See how lopsided he is?  I made the pom pom tail
with a different yarn so it would be easier to
work with.

Tuesday, January 10, 2017

Another Farm Play Set

I just finished the farm play set that I needed to get done in January.  It is for a little one that is turning one at the end of the month.

This shows the entire set.

This is the little cow.  Because I only had a little bit of white felt and I didn't want to wait until I could go buy more, I decided to make the cow black with white for the side of the head and the spot.  I usually make the cow white with black.  I also chose to use gray for the nose, horns, and feet because black cows are usually darker in these areas.

The chick is knitted instead of being made from material.  I decided to add her to the collection because I like her so much.  She is one of the cuter animals that I knit from this pattern collection.  Anyway, every farm needs a chicken or two.

I was quite pleased with the little pig.  I had so many problems with the snout the last time I made it.  This time, it was the ears that don't look quite the  same, but that is okay.  Many pigs don't have matching ears and I think it gives it character.

This is actually the second lamb I made for the set.  I chose the wrong material the first time, and when I stuffed it, it started to tear.  I went back and doubled the material, but after getting the face on, I realized that it had a big hole in the hip on one side.  It simply was not durable enough for a baby to play with.  This material was tricky because it peeled off the backing that it was on.  Once sewed in place, it seems to stay intact.  Hope it stays that way.  It is so soft and fluffy.

This little duck always comes out pretty much the same.  I made this one out of the same soft fleece that I made my last one out of.  I forgot to put stuffing in the feet, but I think they are actually better without the stuffing.  Duck feet are pretty flat.

I made this horse just like the last one because I liked it so much.  It is made of felt and is a very simple pattern to make.

This shows the cow pouch without the animals in side.  This is supposed to be a pillow, but I like to put a zipper in the bottom and leave it empty so the animals can be stored inside when not being played with.  I also changed the pattern a little bit for this cow.  The pattern calls for straight legs, but we all know that cows do not have straight legs.  I added a little knees to this one and I think she looks a little better.

Every farm needs a farmer.  Since this play set is for a little girl, I decided to make a farmer girl.  I also chose to knit her instead of making her from material like I did my other farmers that I have made to go with this play set.

This shows the cow with everything stuffed inside.  I was much more successful with getting everything in this cow, including the extra animal (the chick) and the farmer girl.  What happened with my last set is that I read the pattern wrong for the cow's body.  I thought I had to only make one body part and fold it in half.  That is why it was so long and skinny.  This cow has plenty of storage space to house all her little farm animals, including her farmer girl.

The little girl I made this play set for is too old to actually have a mat to play on, so I did not make a mat.  Instead, I opted to make a small crib sized quilt.  I just used the left over material I had from the mat that I made before and just zigzagged it onto the quilt through all thicknesses.  This way, the quilt stays in place and I didn't have to tie it.  I used a fancy stitch around the edge that doesn't really show up that well.  The front is cotton with the flannel print that has farm animals, barns, tractors, etc. on it added to make it a farm themed quilt.  The back is a pretty dark mint green flannel that shows the stitching that was added to the front.  I don't know if the person buying the set will want the quilt, but if not, I will just give it to my new little grand baby that is on the way. By making it with the off white front and the green back, it can go for either a girl or a boy. That works for me, because I don't know what we will be getting this time.  Hoping for another boy, but we will see.
Now that I have this play set made, I need to get onto the fox themed play set that needs to be done for February.  As I was finishing up on the doll tonight, my son stopped by and asked me how much I charge for a play set because he has a friend who is expecting a baby soon, plus his girl friend's sister is also having a baby.  He is interested in a couple of play sets.  I guess I am in for some more work ahead.  Doesn't matter, because I do like to make toys.

Monday, January 9, 2017

Gloves Finished

With a lot of long hours and little sleep during the month of December I managed to finish all of the projects I needed to get done for Christmas except for one glove in my husband's pair.  I figured he would understand if his weren't finished by the time we celebrated our family Christmas on the Tuesday after Christmas.  He knew how hard I had been working to try to get them all finished.  It is a good thing we had a few extra days after Christmas before we celebrated so I could get them all done.

These are the two women's gloves I had to do over because the first ones I did sold at the holiday festival.  The black ones are for Cheryl and the brown ones are Kay's.  I guess I need to shorten the fingers on Cheryl's, but she has not returned them to me so that I can do that.  It isn't hard to do because each finger is done separately and ends at the tip, so I just need to take out a couple of rows and retie them off.  It just takes time.

These are for Ellis and Portia.   All the boys gloves have just the fingertips a different color whereas the girls have the multicolored fingers.

These are for Dot, Lucy, Ezra, and Annie.  Dot did not like the way the fingers felt so I had to take hers out and redo all the fingers except for the thumb.  She wanted them to have just purple fingers so I took out the last couple rows of the green for the palm and started the break in color there so it would not feel funky where the color changed for each finger.  It worked and she likes them better, but I did not include a picture of the do-over gloves.  Annie's mittens needed to be longer for the wrist, so I just picked up stitches on the cuff and knitted the other direction to lengthen them.  I guess they fit now, because they never told me if they did after they got them back.

These are for Lexi and Joey. Lexi almost always wears pink, so her main color was pink.  Joey's gloves match his coat wonderfully.  I was going to do his in red with navy blue fingertips but he just got a coat that is black with this bright blue design of some kind swirling throughout.  These were the exact color of his coat so I used the navy blue and red for Ezra's.

These are for Zoe and Jackson.  I had to redo all of Zoe's fingers on one glove because they were a little too tight.  Somehow one glove fit and the other did not.  I always knit it the same, but the tie in for the colors seemed to be the problem.  There are always so many strings to tie in and hide when there are so many different colors being used.  I could not actually tie a knot because it left a bump if I did, so I had to weave all the loose ends into the yarn in such a way that they would not ravel or come undone.  It took almost more time to tie in the loose ends than to actually do the knitting of the glove.  It was probably a crazy idea to make them so crazy looking, but I just wanted to use all the colors so the girls would not be jealous of the color of some other girl's gloves.  All the same colors were used in each glove.  What varied was the main color and the cuff for each pair.

These are the only pictures I have for the six pairs of men's gloves that I made.  I had three pairs finished before the festival, but I sold one pair and had to make another one plus the other three I needed for Christmas.  These gloves were all made from 100% wool and all of them fit wonderfully.  Each were done in a different color.
By the time I had finished almost all of the gloves, I finally got a better way of tying in the fingers. At first, I was always getting a big hole, but I discovered a way to avoid that and the last pairs of gloves were being done without the holes.  I wish I had discovered it earlier because it would have saved time and effort to weave the holes shut.  Gloves are not really that hard to do, but I never want to make so many again at one time.

I have started working on the projects that I need to finish that were ordered at the festival.  I need to get two play sets completed.  I am almost finished with the one that needs to be done for January and will get started on the other one as soon as I finish this one.  It needs to be done for February.  I may take a break with knitting after that for awhile.  My arms and fingers have taken a beating from all of these extra hours of constant work.